Fretless Bass Conversion… Part II
by Daniel Menjívar • #diy #musicAs promised, Here’s an update on my progress with the fretless bass conversion:
First, the process of ripping out the frets went well. I used two soldering pencils to heat the fret wire and made sure they were really hot before pulling them out to reduce the amount of splintering/chipping. The fret lines near the headstock are perfect – nice and straight and no visible splintering, but farther down the neck, around the 18th fret onwards looks a little ugly, but still decent enough I suppose. It won’t affect the playability of it since it will be filled with wood filler – it’s only an esthetic flaw. I’m confident that next time it will be flawless for sure though. It took about a day to pull the frets out – all it takes is a lot of patience and very delicate sanding in the spaces afterwards. Oh, and did I mention a lot of patience? ;-)
Filling the spaces with wood filler was a slow process – I wanted to make sure they were filled in all the way, compacted, tight and with no air pockets anywhere, so I filled each fret space individually, little by little as I pushed down the filler into the spaces. There are definitely no air pockets anywhere, for sure. I took my time doing that too – about a whole day. Afterwards, I generously covered the fret lines with wood filler…
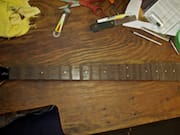
Here’s a couple photos of the filled fretboard.
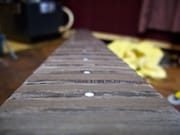
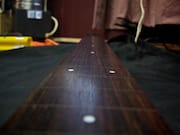
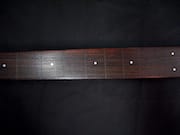
And Here’s the fretboard with the excess wood filler removed, sanded down, cleaned and lightly oiled:
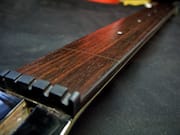
Next, I shaved/sanded down the back of the neck and reshaped it. it’s much thinner and faster-feeling now. :-) At this point, I re-assembled the bass and played it for a while to make sure there were no high spots on the fingerboard and to see if I needed to tweak anything else on the neck/fingerboard. The bass sounded great as a fretless, just as I thought it would, and it played exceptionally well too! It was actually really hard to put it down, but at the same time, I was excited about getting it finished too… (Of course, I recorded the bass before any modifications, and also at this point. Next time I record it, it will be with the thick body finish & paint removed, and the bass fully complete…)
In Part III of this article (coming soon), I’ll cover the process of sanding the body, dying the parts, decisions about the hardware and electronics, etc. I have a lot more photos to share too.
Update –
My mother and younger brother just looked at the fretboard (after dying) and they could hardly notice the chipped fret lines. "You have to look really close to see it." I suppose it’s a combination of me being too much of a perfectionist, and the dye covering the "flaws" really well…
Yes indeed, with the fretboard dyed black now, you really have to be looking for it to notice it :-) Nice! Plus, once the epoxy is on, and the strings in the way, you probably won’t even see it at all.